


Ever thought about giving your new tires a quick look-over? It might feel like extra work, but a simple inspection can help you avoid surprise repairs and keep your ride safe and smooth.
In this post, we’ll show you easy steps to spot tiny issues before they turn into major problems. It’s like checking your tire grip (how well the tire holds the road) before a long drive.
These handy tips make you feel more confident each time you hit the road. And hey, who doesn’t like knowing their car is in top shape?
Key Post-Installation Tire Inspection Steps

Right after you get new tires on your car, it’s a good idea to take a quick look at them. This simple check helps keep your ride safe, smooth, and even saves fuel. Think of it like a friendly pit stop before you hit the highway.
When you’re checking, you want to make sure your tires are sitting just right on the road. A little inspection can catch small issues, like tiny leaks or marks of damage, before they turn into big hassles. So, let’s go over the four steps that can help you feel more confident every time you drive.
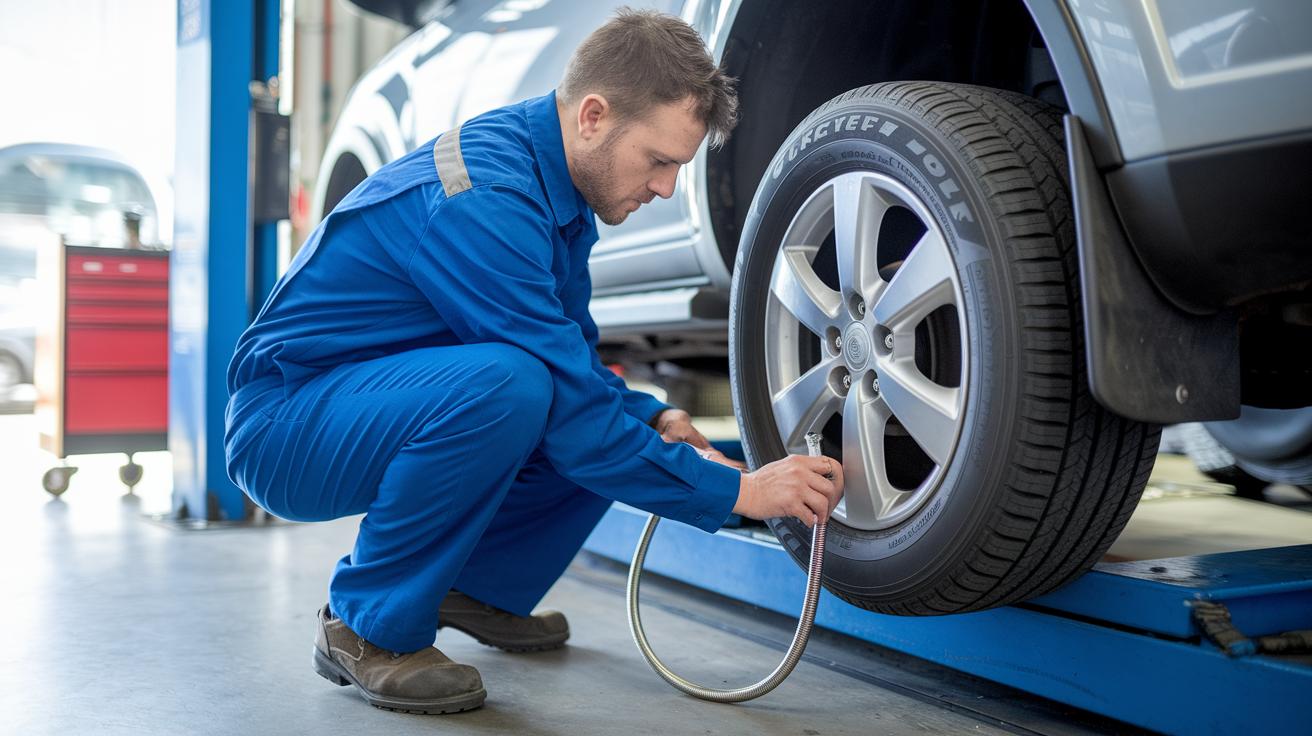
Check Air Pressure
Grab a gauge that’s been set up right to measure your tire pressure. Your car’s manual or the sticker on the driver’s door tells you the perfect pressure. Keeping the correct pressure means your tires will hug the road well, making your ride smoother and your handling tighter. If your tire is reading low, just add air to match the recommended PSI. Simple and effective.
Measure Tread Depth
Next, check how worn the tire surface is by using a tread depth gauge. This tool helps you see if the grooves in your tire are still deep enough. Legally, tires shouldn’t go below 2/32 inch, but many experts say it’s a good idea to replace them once they dip under 4/32 inch. Shallow treads can mean less grip on wet roads and might even affect your fuel use, so it’s worth keeping an eye on.
Scan for Sidewall and Tread Damage
Take a good look over the whole tire. Look for cuts, punctures, cracks, or any bulges. These little signs can hint at problems that might get worse if you ignore them. It only takes a quick glance to spot any issues, and it helps you avoid surprises down the road.
Inspect Valve Stem and Cap
Finally, check the valve stem (the little part where you add air) to see if it’s leaking or looks worn out. Also, make sure the cap is on tight. A secure valve stem keeps the air in, so your tires keep the right pressure. This small step is key to making sure your car is safe and ready to roll.
Ensuring Proper Lug Nut Torque and Bead Seating

When you mount a wheel, it’s key to use the right amount of torque to keep your car safe. A calibrated torque wrench set to 80–100 ft-lbs (a measure of turning force) makes sure your lug nuts stay tight and your rim stays undamaged. It’s like checking off every detail on a road trip checklist, you want everything secure and in place.
Once you’ve sorted the torque, the next step is bead seating. This means making sure the tire bead (the edge of the tire) fully meets the rim flange (the edge of the wheel). If these parts aren’t touching perfectly, you might get leaks or even risk your tire coming off. A handy tip is to listen for a soft “pop” (like a tiny click) as the bead snaps into the right spot, and then give it a good look around to confirm it’s even all the way around.
Taking these extra moments for a proper check can boost your trust in the installation and help your ride perform its best. For more details, feel free to check out the guidelines in the "tire installation and alignment" resource at https://tityres.com?p=933.
Performing Balance and Alignment Verifications

Making sure your wheels are aligned helps your car drive smoothly. You should have your alignment checked every 6,000 to 10,000 miles or about once a year. This check keeps your tires wearing evenly and your car handling the way it should. Technicians use special tools to measure the angles of your tires. If your steering wheel starts to drift or if your car leans to one side, it might be time for an adjustment. A proper alignment not only saves fuel but also reduces tire wear, making every drive safer and more comfortable.
Balance checking is just as important. It helps cut down on vibrations, especially when you drive above 50 mph. If you feel a shake, it could mean your wheel and tire assembly is off balance. Technicians use a dial indicator (a tool that measures tiny shifts) to spot any side-to-side or front-to-back differences. Even a small imbalance can lead to noticeable shakes on the road. By checking both alignment and balance regularly, you catch problems early and keep your ride as smooth and secure as possible.
Detecting Installation Damage and Irregular Wear Patterns

After your tires are installed, take a moment to check them over. This quick look is like checking your fuel gauge before a big road trip, it helps you catch any problems early.
- Cuts and punctures
- Sidewall bulges or cracks
- Curb rub abrasions
- Feathered or scalloped tread wear
- Localized tread cupping
Cuts or punctures usually come from sharp objects that can weaken the tire. Bulges or cracks on the side might mean the tire got hit hard or wasn’t seated properly on the rim. Curb rub scratches happen when the tire touches the curb, and though they seem small, they can add up over time. Feathered or scalloped wear is a sign that the tire alignment might be a bit off, like a door that doesn’t quite close right. Localized cupping indicates that something might be off with your suspension, causing uneven wear. If you notice any of these signs, it’s best to have a pro take a closer look to see if you need any repairs or tweaks.
Scheduling Routine Post-Install Maintenance for Safety
When you put on new tires, it's a smart idea to schedule regular check-ups to keep your ride safe. Experts usually suggest giving your tires a quick once-over every 6,000 to 8,000 miles, or about every six months. You might even do it during an oil change. In these check-ups, you can look at the tire pressure, inspect the tread (that's the part of your tire that touches the road and wears down over time), and spot any damage. Imagine taking a few extra minutes at the service center just to ensure everything looks good. It's a simple step that helps keep your driving smooth and secure.
Tire rotations should also be on your maintenance list, ideally every 5,000 to 8,000 miles. Rotating your tires means swapping them around to balance and even out the wear, so each one does its job well under various driving conditions. This routine can really help extend the life of your tires and maintain a reliable grip on the road.
And don't forget to get a professional check-up now and then. A skilled technician can do a detailed review, catch any small issues early, and even confirm that your tire warranty is still in good shape. These professional inspections not only protect your investment but also help keep your vehicle performing at its best.
Final Words
In the action, we covered essential steps to spot check your tires after mounting. We broke things down from measuring air pressure and tread depth to inspecting valve stems and spotting any damage. Each step plays a key role in keeping you on the road safely.
Using these post-installation tire inspection tips can help you catch potential issues early. Stay proactive, keep your tires in check, and drive on with confidence.
FAQ
What are post installation tire inspection tips in Florida?
Post installation tire inspection in Florida means checking that each tire has the proper air pressure, tread depth, no visible cuts or cracks, and that the valve stems are secure, keeping you safe under the Florida sun.
Why does the traction control light come on after changing tires?
The traction control light comes on after tire changes when wheel sensors may need recalibration. This light signals that a quick check of sensor connections might be needed to get things back in balance.
Why do the ABS and traction control lights appear after a tire rotation or tire change?
The ABS and traction control lights show up when the sensors may not be properly aligned or recalibrated after a tire rotation or change. Getting them checked ensures your car’s systems communicate correctly.
What is Discount Tire?
Discount Tire is a well-known service center offering a wide selection of tires at competitive prices, backed by professional mounting and balancing services that many drivers trust.
What does the 3% rule for tires mean?
The 3% rule for tires points to monitoring uneven tread wear; if one tire wears 3% more than its partner, it might signal alignment or suspension issues, indicating a need for a closer inspection.
Do you need to retorque tires after installation?
Retorque after tire installation means checking the lug nuts again after a short drive. This recheck helps keep them tight and avoids any risks of loosening during further driving.
What should you do after installing new tires?
After installing new tires, check the air pressure, measure the tread depth, inspect the sidewalls for any damage, and verify balance to catch issues early and drive with confidence.
How do you properly inspect tires?
To properly inspect tires, use a gauge for air pressure, a depth gauge for tread, visually check for cuts, punctures, and bulges, and examine the valve stems for leaks, ensuring everything is in top shape.
